What is a REPL?
A REPL (say it, “REP-UL”) is an interactive way to talk to your computer in Python. To make this work, the computer does four things:
- Read the user input (your Python commands).
- Evaluate your code (to work out what you mean).
- Print any results (so you can see the computer’s response).
- Loop back to step 1 (to continue the conversation).
The term “REPL” is an acronym for Read, Evaluate, Print and Loop because that’s precisely what the computer does..!
The computer tells you it’s waiting for instructions by presenting you with
either three chevrons (>>>) or a numbered prompt (In [1]:). You just type
your commands and hit return for the computer to evaluate them.
Programmers use the REPL when they need to “work stuff out”. It’s a bit like a jotter where you “rough out” ideas and explore problems. Because of the instant feedback you get from a REPL it makes it easy to improvise, nose around and delve into what the computer is doing. Take it form us, this is one of the most useful features of Mu, and once you’re comfortable with the REPL, you’ll wonder how you ever coped without it.
While all REPLs work in the same way, the features and capabilities of the
REPL will differ depending on which mode you’re currently using in Mu. However,
there are two commands that will work on all version of the REPL that will be
incredibly useful: dir and help.
The dir command tells you what there is. If you use it on its own, it’ll tell
you what Python currently knows about:
>>> dir()
['__annotations__', '__builtins__', '__doc__', '__loader__', '__name__',
'__package__', '__spec__']
While this list of names may look mysterious at the moment, if you create a new variable you’ll see it in the list of things Python knows about:
>>> name = "Nicholas"
>>> dir()
['__annotations__', '__builtins__', '__doc__', '__loader__', '__name__',
'__package__', '__spec__', 'name']
But dir can do more! If you use it with the name of something Python knows
about, then dir will return all the attributes of that thing. For example,
the name variable is actually a string object and string objects have all
sorts of useful attributes. If I wanted to know what they were, I’d pass the
name object into dir like this:
>>> dir(name)
['__add__', '__class__', '__contains__', '__delattr__', '__dir__', '__doc__',
'__eq__', '__format__', '__ge__', '__getattribute__', '__getitem__',
'__getnewargs__', '__gt__', '__hash__', '__init__', '__init_subclass__',
'__iter__', '__le__', '__len__', '__lt__', '__mod__', '__mul__', '__ne__',
'__new__', '__reduce__', '__reduce_ex__', '__repr__', '__rmod__', '__rmul__',
'__setattr__', '__sizeof__', '__str__', '__subclasshook__', 'capitalize',
'casefold', 'center', 'count', 'encode', 'endswith', 'expandtabs', 'find',
'format', 'format_map', 'index', 'isalnum', 'isalpha', 'isdecimal', 'isdigit',
'isidentifier', 'islower', 'isnumeric', 'isprintable', 'isspace', 'istitle',
'isupper', 'join', 'ljust', 'lower', 'lstrip', 'maketrans', 'partition',
'replace', 'rfind', 'rindex', 'rjust', 'rpartition', 'rsplit', 'rstrip',
'split', 'splitlines', 'startswith', 'strip', 'swapcase', 'title', 'translate',
'upper', 'zfill']
That’s a lot of attributes! Given the names of some of them, they may
be quite useful. For example, let’s say I want to get an upper-case version of
the name object. I notice there’s an upper attribute in the list returned
by dir so I need some way to check what it does. This is where help comes
into its own. If you pass something Python knows about into help it’ll
respond with some useful documentation:
>>> help(name.upper)
Help on built-in function upper:

upper(...) method of builtins.str instance
    S.upper() -> str

    Return a copy of S converted to uppercase.
The first line tells you that upper is a method of the built-in string class.
The second line tells you that the result of calling upper results in a new
string (-> str). The final line contains a plain-English description of what
upper does. So, I should expect it to return an upper-case version of the
value of name:
>>> name.upper()
`NICHOLAS`
It worked!
With just the dir and help command you’ll be able to interrogate
and query the whole of Python.
It's often the case that you need to repeatedly enter the same chunk of Python into the REPL. As an aid to users, REPLs often have a command history function to select earlier commands used in the current session. To move backwards in time through your command history, tap the up arrow. Keep tapping to move further back in time. If you go too far, tap the down arrow to move forwards in time through the command history until you get a blank line (meaning you're back at the "present").
Another useful feature is Tab completion. If you type something and
hit the TAB key the REPL will try
to guess what you mean. For example, if I assigned a string like this:
name = "Nicholas" and then typed
na and pressed
TAB the REPL would complete the word
for me as name.
If the REPL cannot find a clear result, it'll display the available
completions. This is very useful if I want to explore the attributes of
an object in the REPL: I type
name. (note the ".") and then press
TAB.
Since there are many attributes which could follow the
. the REPL
lists them all.
Tab completion is demonstrated below:
Here’s another example: let’s pretend you need to do some arithmetic, so why not use the REPL as a calculator?
>>> 1 + 1
2
>>> 10 - 1
9
>>> (5 * 5 + 5 ) / 4
7.5
More advanced mathematics may not at first appear possible. However, if we
import the math module and use dir and help we can soon find the things
we may need:
>>> import math
>>> dir(math)
['__doc__', '__loader__', '__name__', '__package__', '__spec__', 'acos',
'acosh', 'asin', 'asinh', 'atan', 'atan2', 'atanh', 'ceil', 'copysign', 'cos',
'cosh', 'degrees', 'e', 'erf', 'erfc', 'exp', 'expm1', 'fabs', 'factorial',
'floor', 'fmod', 'frexp', 'fsum', 'gamma', 'gcd', 'hypot', 'inf', 'isclose',
'isfinite', 'isinf', 'isnan', 'ldexp', 'lgamma', 'log', 'log10', 'log1p',
'log2', 'modf', 'nan', 'pi', 'pow', 'radians', 'sin', 'sinh', 'sqrt', 'tan',
'tanh', 'tau', 'trunc']
>>> help(math.sqrt)
Help on built-in function sqrt in module math:

sqrt(...)
    sqrt(x)

    Return the square root of x.

>>> math.sqrt(12345)
111.1080555135405
Just like in “normal” Python you can import modules, assign values to objects, use functions and create loops:
>>> import random
>>> names = ['Lisa', 'Kushal', 'Mary', 'Kate', 'Carlos', 'Zander', ]
>>> while True:
...   print(random.choice(names))
...   wait = input()
...
Kate
Kate
Zander
Mary
Zander
Kushal
To break out of the infinite loop, you need to press CTRL-C. This will
result in a message that looks like this:
Traceback (most recent call last):
  File "<stdin>", line 3, in <module>
KeyboardInterrupt
It’s just Python saying it’s been interrupted.
Python 3 REPL
In Python 3 mode, the REPL uses Python to control your computer.
This version of the REPL is the most powerful. For example, as you type, the REPL will show you hints for the code you’re using.
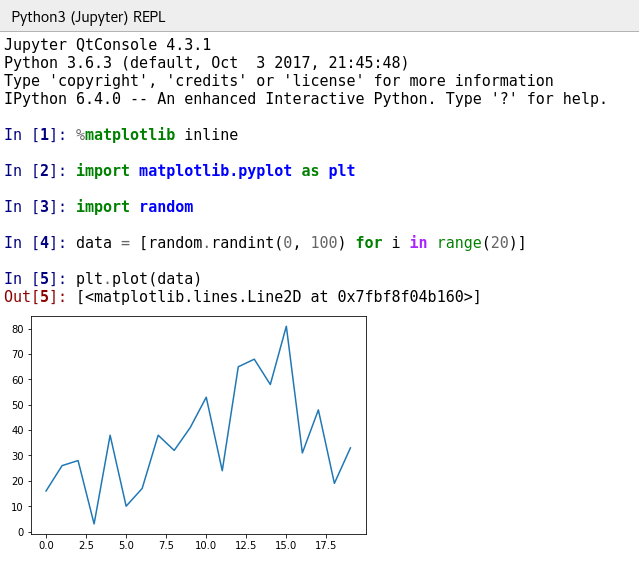
Another powerful feature of Python 3’s REPL is the ability to embed graphs, if
you have the matplotlib module installed (If you have installed Mu via one
of the installers for Windows or OSX, or via pip for Python then you will
have matplotlib installed). This is really useful for visualising data you
may be working with in the REPL.
To make this work you should start your REPL session with the
%matplotlib inline command. Then it’s just a simple case of using Matplotlib
as described in its documentation. The
code for a very simple example is shown below followed by an example of how it
should look.
%matplotlib inline
import matplotlib.pyplot as plt
import random
data = [random.randint(0, 100) for i in range(20)]
plt.plot(data)
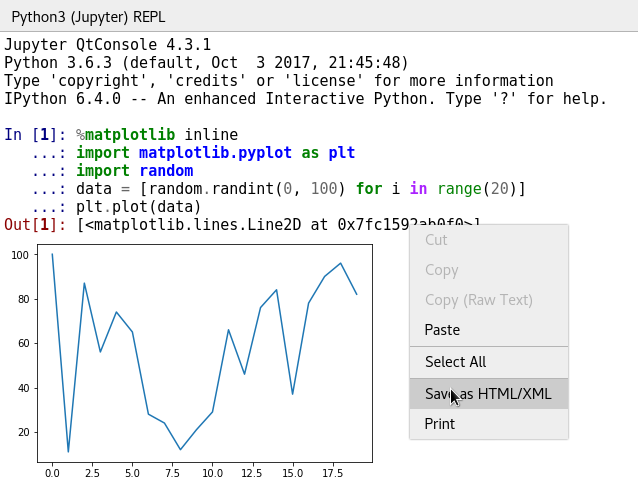
Another useful feature is the ability to save the current REPL “session” as an HTML (web) page on your local file system. Simply right-click the REPL to get to the context menu and select “Save as HTML/XML”, as shown below:
The REPL is actually a part of the amazing Jupyter project - a way of creating and sharing documents that contain live code, visualizations and other fun stuff. You can read more about the REPL’s capabilities in the project’s documentation. If you enjoy using the Python 3 REPL you should consider exploring the “full” non-beginner Jupyter software as your next step.
The Python 3 REPL, described above, is very powerful.
Because of the limited resources and processing power of microcontrollers, the MicroPython based REPLs, described below, have less features. For example, you cannot embed graphs. However, they are still remarkably powerful (with TAB completion and command history available in the usual way) and give you direct access to controlling the connected board.
Adafruit REPL
It’s possible to connect to CircuitPython’s REPL running on the connected board. To be very clear, when you use this REPL you’re using CircuitPython to evaluate code on the connected Adafruit board rather than the computer that’s running Mu.
Getting to the REPL is very easy:
- Click the “Serial” button to open a serial connection to the connected device.
- Type “CTRL-C” (keyboard interrupt) to stop CircuitPython from continuing with whatever it is doing.
- Press any key (as instructed).
- Use the REPL!
These steps are demonstrated below.
BBC micro:bit REPL
The REPL on the BBC micro:bit is easy to use, just click the “REPL” button as shown below.
Things to try in the micro:bit REPL:
>>> from microbit import *
>>> display.scroll("Hello from the REPL")
>>> import this
>>> import love
>>> import antigravity
